Friday, October 30, 2009

Reusable Pumpkin Art

In the fall, I really enjoy driving down the road and looking at everyone's natural fall decor (the beautifully colored leaves) and other outdoor fall/halloween decorations. However, until now, I haven't had any of my own other than a yard full of leaves from the 2 huge trees in our yard.
After reading a few of my favorite blogs (this one, this one, and this one) learning all about their fall decorations or favorite fall things, I got inspired. Last weekend, I went to Michael's and they had their fake pumpkins, both orange and white, on sale. I purchased two of them, one large white one and one medium orange one...which Julie proceeded to carry (and drop) around the entire store...pretty cute.
This week I did some simple internet research for some pictures and letters to trace or copy and then I started work on them this afternoon. Here are my supplies (the bats I printed off of one of the blogs and then cut out; the G, for our last name, was found with a Google search).

The next step was to tape the letter and pictures into place on the pumpkins...which is tricky when my kid wants to sit on my lab and "help". But we managed to get it done!

Then I simply took a pen and traced the images (I did only have 2 bat cutouts, but just traced them once and then moved the bats and traced them again).

Then I took the papers off and using a Sharpie, traced and colored in the G and the bats.

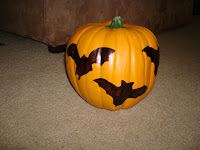
Finally, I just finished the white one up with some free-hand-drawn bugs and worms. Here are the final products.

Here they are, now decorating my tiny porch beautifully!


The whole process only took me about an hour today...easy peasy!!!

Sunday, October 25, 2009

Date Night

For those who know me, you know my beautiful baby girl. Julie is a real blessing but has also been a real challenge...and sometimes we just need a break to get away.

Last night, Stuart's mom and sister came over and watched Julie, allowing Stuart and I a chance to go out to a movie and then dinner...with grown up conversation. I am so thankful to have family close by that is willing to spend their evening with my baby. It was such a blessing to take time away and just spend some time together as husband and wife.

So, thank you both so much for helping us out and giving us a night off. You amazing!!

Friday, October 16, 2009

Major Home Improvement Project #1

This post has been a long time coming...but for me it has been well worth the wait. However, I am sure that you missed me greatly over the last few weeks. (at least I hope so!)

We recently replaced our gas heat and window unit a/c with central heating and air. I had been dreading the winter with a 2 year old walking around with hot radiators in our house, but I dread no more!!! The radiators are no more. We decided to do dual zone heating and air since our house is so old that it had no duct work. The workers did the work over two weekends with one weekend off in between...needless to say our house was a bit messy for a few weeks, but again, so worth it! So below are the steps it took us to get it all installed.

Step 1: Take pictures of some of the radiators to show you a good solid before. Below see shots of our living room, dining room, and spare/play room. (Please note our radiator/window unit combo in the living room, lovely, huh??)


Step 2: A couple of weeks before the workers were scheduled to start their work, my wonderful husband had to remove all radiators (5 total), piping (both the gas pipes and the pipes from the furnace to the radiators), and the furnace from our house, as well as a small closet from the basement. This was no small or easy job. It took days of very hard manual labor on Stuart's part, as well as a couple days of help from his brother (thank you so much, Jesse!). Here are a few pictures after all of their amazing work. (We obviously have a bit of work to do on our walls thanks to radiators not being moved by our house's prior owners when painting...not to mention cracks in our plaster walls, but still a massive improvement already!!)

Step 3: Sit back while the workmen did their thing! They came one Saturday and worked most of that day and then came back Sunday for a few hours to finish the first floor heating and air. Below are pictures from Saturday night...they had all the holes cut in the floor, but didn't get the vent covers in that night. Julie was very interested in what was happening to her house. See her contemplating how she could "fall" into the hole in the kitchen without anyone noticing?? (yes, she actually fell into the one in our living room, with one leg, and it was funny...too bad I didn't have my camera at the ready)

And here are the pictures of the new vents in our floors.


After the almost 2 week break, the workmen came back for a little while Friday morning and then pretty much all day on Saturday to do the upstairs unit. Apparently, it was pretty tough with our limited attic/storage space but they did it! And got it completed right before a cold front came through...perfect timing, thank goodness!! Because the air handler for the upstairs in in our attic space, our vents are in the ceiling up there. See an example of those below.
And last but not least, here are some pictures for any of you who want to see the ugly stuff from our basement and backyard...first is the air handler for our first level and the last one is of one of the two heat pumps that now sit outside our basement door, along with my adorable baby girl and fabulously hard-working hubby.

So, that is the story of how we went from gas heat with hot radiators and window units to central heating and air. We love it and will highly recommend the guys who installed ours...if you need a name and live in the area, just let me know I will gladly share!

Monday, September 21, 2009

VistaPrints

I was recently introduced to VistaPrints and all their freebies by a friend on her blog HogWash. Thanks to her I have found yet another new addiction...because I really needed another one.

Anyways, VistaPrint offers lots of things for free all you have to pay is shipping...what a deal! So below is my first and most definitely not my last order!


Matching pen and sticky note pad, personalized for me

Personalized note pad

100 Postcards to use on gifts (front)

Postcards to use on gifts (back)

10 Personalized Thank You cards with envelopes
Personalized keychain with characatures for each member of my family

I got all this, plus 140 return address labels and 25 business card sized magnets that will be used in future gufts (hence the lack of picture, can't give it all away), all for only the cost of shipping. And the question I am sure you are asking yourself is...but how much did you actually save??? My actual savings on all of this fabulous stuff was....$79.93!!! WOW!!!

Thank you so much Nikki, for both the website and some of the ideas! For more ideas, check out her blog, Hogwash. What a great find!

Friday, September 18, 2009

Do you ever wish you were deaf??

Have you ever wished you were deaf....at least temporarily?? I mean, I am so thankful for my ability to hear...most of the time. But have you ever experienced a sound, any sound that just made you wish, even if only for a split second, that you couldn't hear at all??

Right now, I have a 21 month old little girl who is screaming at the top of her lungs because she can't have the snack she wants....and has been doing this for the last 30 minutes. I have offered her the same snack, Ritz crackers, at least 4 or 5 times over this time period always to a resounding, "NO!"

I wonder where she gets this stubbornness? If it is from where I think it is, I believe I now owe my parents a big, Huge, even GINORMOUS apology!! So here it is.....I AM SO UNBELIEVABLY SORRY!!!!!!!!!!!!!!!!!!! And I think now would be a good time to award them with the Amazingly Patient Parent Award!!!! Congratulations....and again, I am very sorry for anything I may have put you through (like my last half hour)! I love you both!

Sunday, September 13, 2009

It's a Birthday!!!

Well, today is my wonderful husband's 25th birthday (I know, I know, he is such a baby!).

I always have quite the delema figuring out not only what to get him for holiday's like this or Christmas or our anniversary or Valentine's day or...well, you get the idea, but also how to keep him from figuring out what I got him before the actual holiday. The problem is that he never wants anything...I mean, anything I can actually afford. He loves Mustangs (the car) and has one he is working on fixing up, but rarely is there something for the car that fits within our gift budgets. So the usual response to the "what do you want for your birthday" question is "I don't know." So, this year he actually gave me 3 ideas, and I picked 2 of them to purchase. One of them is a set of floor mats for his Mustang, that he sent me a link to via email one day a couple of weeks ago. I ordered them this past week and actually expected them to be delivered tomorrow...so no surprise ruined, I planned to tell him today what was coming tomorrow. However, on Friday when I checked the UPS tracking I discovered that they were scheduled for delivery on Friday...but again, no worries, I work from home on Fridays, so I would be there to get them. Unfortunately, they weren't delivered before we left to go out to dinner at 4:30 but when we stopped back by the house after dinner so that Stuart could just run in and pick something up before going out again, he discovered the box sitting on our front porch...surprise #1 ruined...he knew what it was just from the box.

So my second present (and also my deal of the week) was "The Dark Knight" on BlueRay...every place I had looked at this movie it was $30 or more. Last weekend I thought about looking for it at Walmart and guess what their regular, non-sale price for it was???? $20...for a BlueRay!!! I was so excited, except there was one problem...they were sold out. So I went back to Walmart 2 more times last weekend, and they were always sold out. So Wednesday night, Stuart had a meeting to go to and as soon as he left I (and my kid) ran out immediately to Walmart to see if they had gotten it in stock. And they had!!! I was thrilled. So I bought it and hurried home to hide it before Stuart could see it. And I found out this morning, I finally did it! I finally surprised him. He thought the floor mats were it, but surprise!! There was more!

I know this is a silly accomplishment, but after 5 years of trying, I finally did it! (and yes, I realize that on a day that is supposed to be all about him, I have managed to make this all about me! I am amazing that way!)

Anyways, Happy Birthday, Stuart! I love you!

Tuesday, September 8, 2009

Visitors and Home Improvements

How to start a blog...well, that I don't have the answer to...so I will just start by talking about my weekend.

My parents came to visit from MI for the weekend, and we had a great time. However, we all spent a large amount of time at The Home Depot and doing misc things around our house. My wonderful husband and dad spent a day putting a light up outside our back door and then removing a CEMENT sink that was about 4 feet wide from my laundry room. They stated that it is probably best handled by 6 grown men...but the two "super"-men managed it on their own. My hero's! Then they moved my washing machine about 5 feet to the left so that it now sits next to my dryer. I am so excited that I don't have to carry wet laundry 5 feet from the washer to the dryer. Then they spent the next day working on a leaky toilet and did a fabulous job!

After that, I decided I wanted to complete a project so after asking my heros to help me with some drilling/screwing, my mom and I put together an upholstered headboard and then mounted it on the wall. The supplies used were:
  • 3' x 5' piece of 1/2" plywood
  • 2 yards of batting
  • 2 yards of upholstry fabric (from Walmart-for a great sale price)
  • HangMan picture hanger
  • drill/screwdriver
  • staple gun
  • hammer
We laid the fabric top down on the floor (I laid a blanket down first just to keep it from getting dirty), then the batting and then the piece of plywood. Starting with one staple near the middle of each side (including top and bottom) and working to the corners, pulling the batting as tightly as possible, staple the batting to the plywood. Then do the same thing with the fabric. NOTE: one thing I forgot to do, you probably want to iron the fabric before starting the process...it's much easier to do it before rather than afte! Trim off the extra batting and fabric. Finally we just followed the instructions for the Hangman to attach one piece to the wall and one piece to the back of the headboard and then hang it on the wall.

Here is our boring bed before the new headboard:


And here is the fabulous after shot with the new addition:


I am still hoping to make more additions to the bed and the surrounding area (bed skirt, bedside tables, etc) and will share more when there is something more to share. Let me know what you think...